Maintaining a healthy aquarium requires more than just feeding your fish and admiring their vibrant colors. Regular water changes are essential to caring for your aquatic pets, helping to remove excess waste and pollutants that can harm their delicate environment. But how exactly do you perform a proper water change?
Performing regular aquarium water changes is vital for a healthy aquatic environment. Gather equipment, determine the frequency, siphon waste, treat fresh water, refill the tank, and monitor parameters. Follow tips and troubleshoot common issues for success. Your aquarium will thrive with proper care.
Why Are Aquarium Water Changes Important?
Maintaining the health of aquatic life is crucial, and aquarium water changes play an important role in achieving this goal. Fish and other marine organisms excrete waste and release harmful chemicals into the water over time, which can be detrimental to their health. Regular water changes help dilute these toxic substances and replace depleted nutrients.
It also reduces harmful bacteria growth that may cause infections or diseases in aquatic life. A routine water changing schedule and regular cleaning and filter maintenance can help ensure the water quality is at its best, providing a healthy and thriving aquatic environment.

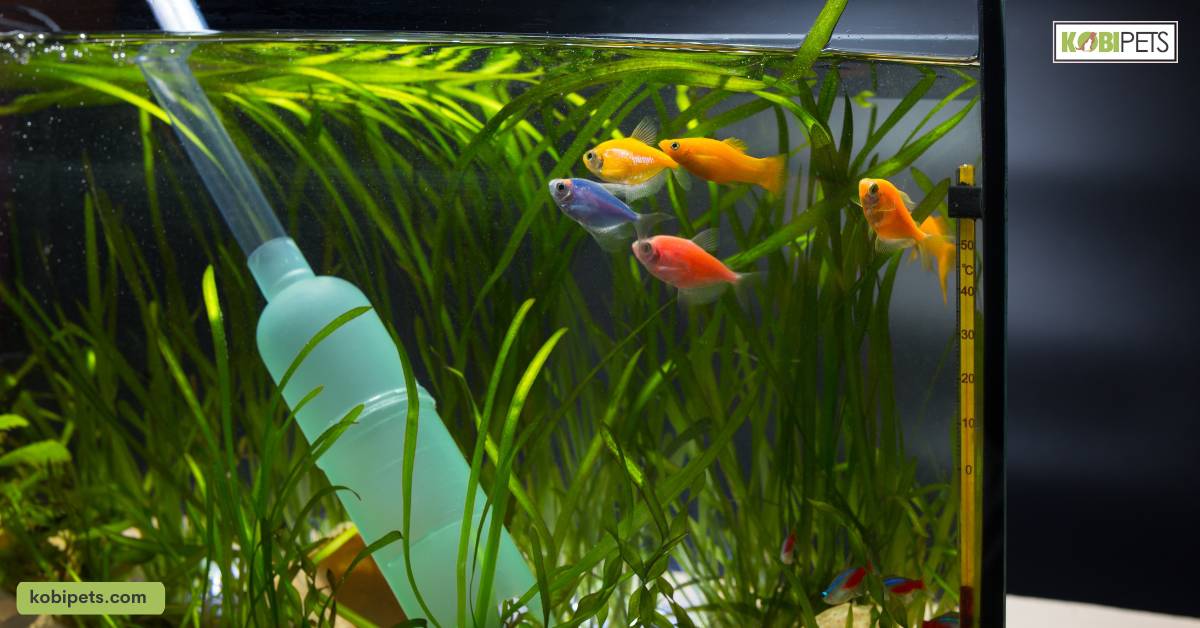
Equipment Needed for Aquarium Water Changes
Aquarium water changes are an essential part of maintaining a healthy aquarium environment. Regular water changes help to remove accumulated waste and excess nutrients from the tank, thus reducing the risk of ammonia buildup and other issues.
- Gravel Vacuum: A gravel vacuum is a device that removes debris and waste from the substrate at the bottom of the tank. It is essential for cleaning the tank during water changes.
- Buckets: Buckets are necessary for transporting old and new water during a water change. It is recommended to have at least two buckets, one for the old water and one for the new water.
- Water Conditioner: A water conditioner is used to remove harmful chemicals, such as chlorine and chloramines, from tap water before using it in the aquarium. It is important to add water conditioner to the new water before adding it to the tank.
- Thermometer: A thermometer is essential for monitoring the temperature of the new water before adding it to the tank. The temperature of the new water should be similar to the current temperature in the tank to avoid shocking the fish.
- Siphon Hose: A siphon hose is used to remove water from the tank during a water change. It is important to use a siphon hose to avoid disturbing the substrate and plants in the tank.

How Often Should You Do Aquarium Water Changes?
Maintaining the cleanliness of an aquarium is crucial for the health and happiness of the fish and other aquatic life it contains. One of the most important aspects of this maintenance is performing regular water changes. The question in every aquarium owner’s mind is: how often should you do aquarium water changes?
The answer depends on various factors, including the size of your aquarium, the number and species of fish, and the type of filter you’re using. However, as a general rule of thumb, most experts recommend changing between 10 and 20 percent of the water in your aquarium every one to two weeks.
This ensures that toxins and waste are properly removed from the water, creating a healthy environment for your aquatic friends. Remember, proper maintenance is key to the overall success of your aquarium.
Steps to Perform Aquarium Water Changes
Regular water changes are crucial for maintaining a healthy aquarium. They help to remove harmful toxins, chemicals, and waste buildup from the tank, thus reducing the risk of diseases and other issues. Here are the steps to perform aquarium water changes.
Step 1: Prepare the Equipment
Before performing a water change, it is essential to gather all the necessary equipment, such as a gravel vacuum, buckets, water conditioner, thermometer, siphon hose, and algae scraper. Make sure that all the equipment is clean and in good condition.

Step 2: Turn Off Equipment
Turn off all the equipment in the tank, such as filters, heaters, and air pumps. This will prevent any damage to the equipment during the water change process.

Step 3: Remove Old Water
Use a siphon hose to remove about 20-30% of the old water from the tank. Be careful not to disturb the substrate and plants in the tank. Use an algae scraper to remove any algae buildup on the sides of the tank.

Step 4: Clean the Substrate
Use a gravel vacuum to clean the substrate at the bottom of the tank. The gravel vacuum will remove any debris and waste buildup from the substrate.

Step 5: Add New Water
Fill a bucket with fresh tap water and add water conditioner to it. Stir well to ensure that the water conditioner is evenly distributed.
Use a thermometer to check the temperature of the new water. The temperature should be similar to the current temperature in the tank. Slowly pour the new water into the tank using a bucket.

Step 6: Turn On Equipment
Once the new water has been added to the tank, turn on all the equipment, such as filters, heaters, and air pumps.

Step 7: Monitor the Tank
After performing a water change, it is essential to monitor the tank for any changes in the water quality or behavior of the fish. Test the water parameters regularly to ensure that the tank environment is healthy and stable.

Tips for Successful Aquarium Water Changes
Aquarium water changes are an essential part of maintaining a healthy and thriving aquatic environment. Water changes help to remove toxins, chemicals, and waste buildup from the tank, thus reducing the risk of diseases and other issues. Here are some tips for performing successful aquarium water changes:
- Ensure you have all the necessary equipment ready before starting a water change. This includes a gravel vacuum, buckets, water conditioner, thermometer, siphon hose, and algae scraper.
- Turn off all the equipment in the tank before performing a water change to avoid any damage during the process.
- Use a siphon hose to remove about 20-30% of the old water from the tank. Be careful not to disturb the substrate and plants in the tank.
- Use a gravel vacuum to clean the substrate at the bottom of the tank. The gravel vacuum will remove any debris and waste buildup from the substrate.
- Fill a bucket with fresh tap water and add water conditioner to it. Stir well to ensure that the water conditioner is evenly distributed.
- Use a thermometer to check the temperature of the new water. The temperature should be similar to the current temperature in the tank.
- Turn on all the equipment after adding the new water, such as filters, heaters, and air pumps.
- Monitor the tank for any changes in the water quality or behavior of the fish after performing a water change. Test the water parameters regularly to ensure that the tank environment is healthy and stable.

In conclusion
Performing water changes in your aquarium is an essential task that should not be overlooked. It helps in maintaining a healthy and thriving aquatic environment for your fish and plant life.
To achieve the best results, ensure you have the right equipment, and follow the recommended frequency and volume of water changes. Also, be sensitive to water temperature and composition, and avoid making drastic changes in a single session.


